> ## Documentation Index
> Fetch the complete documentation index at: https://docs.openbio.tech/llms.txt
> Use this file to discover all available pages before exploring further.
# Interface Overview
> Understanding the OpenBio interface and navigation
OpenBio features a clean, modern interface designed for efficient research workflows. This guide provides a comprehensive overview of every element in the interface and how to use them.
## Main Layout
The OpenBio interface consists of three main sections:
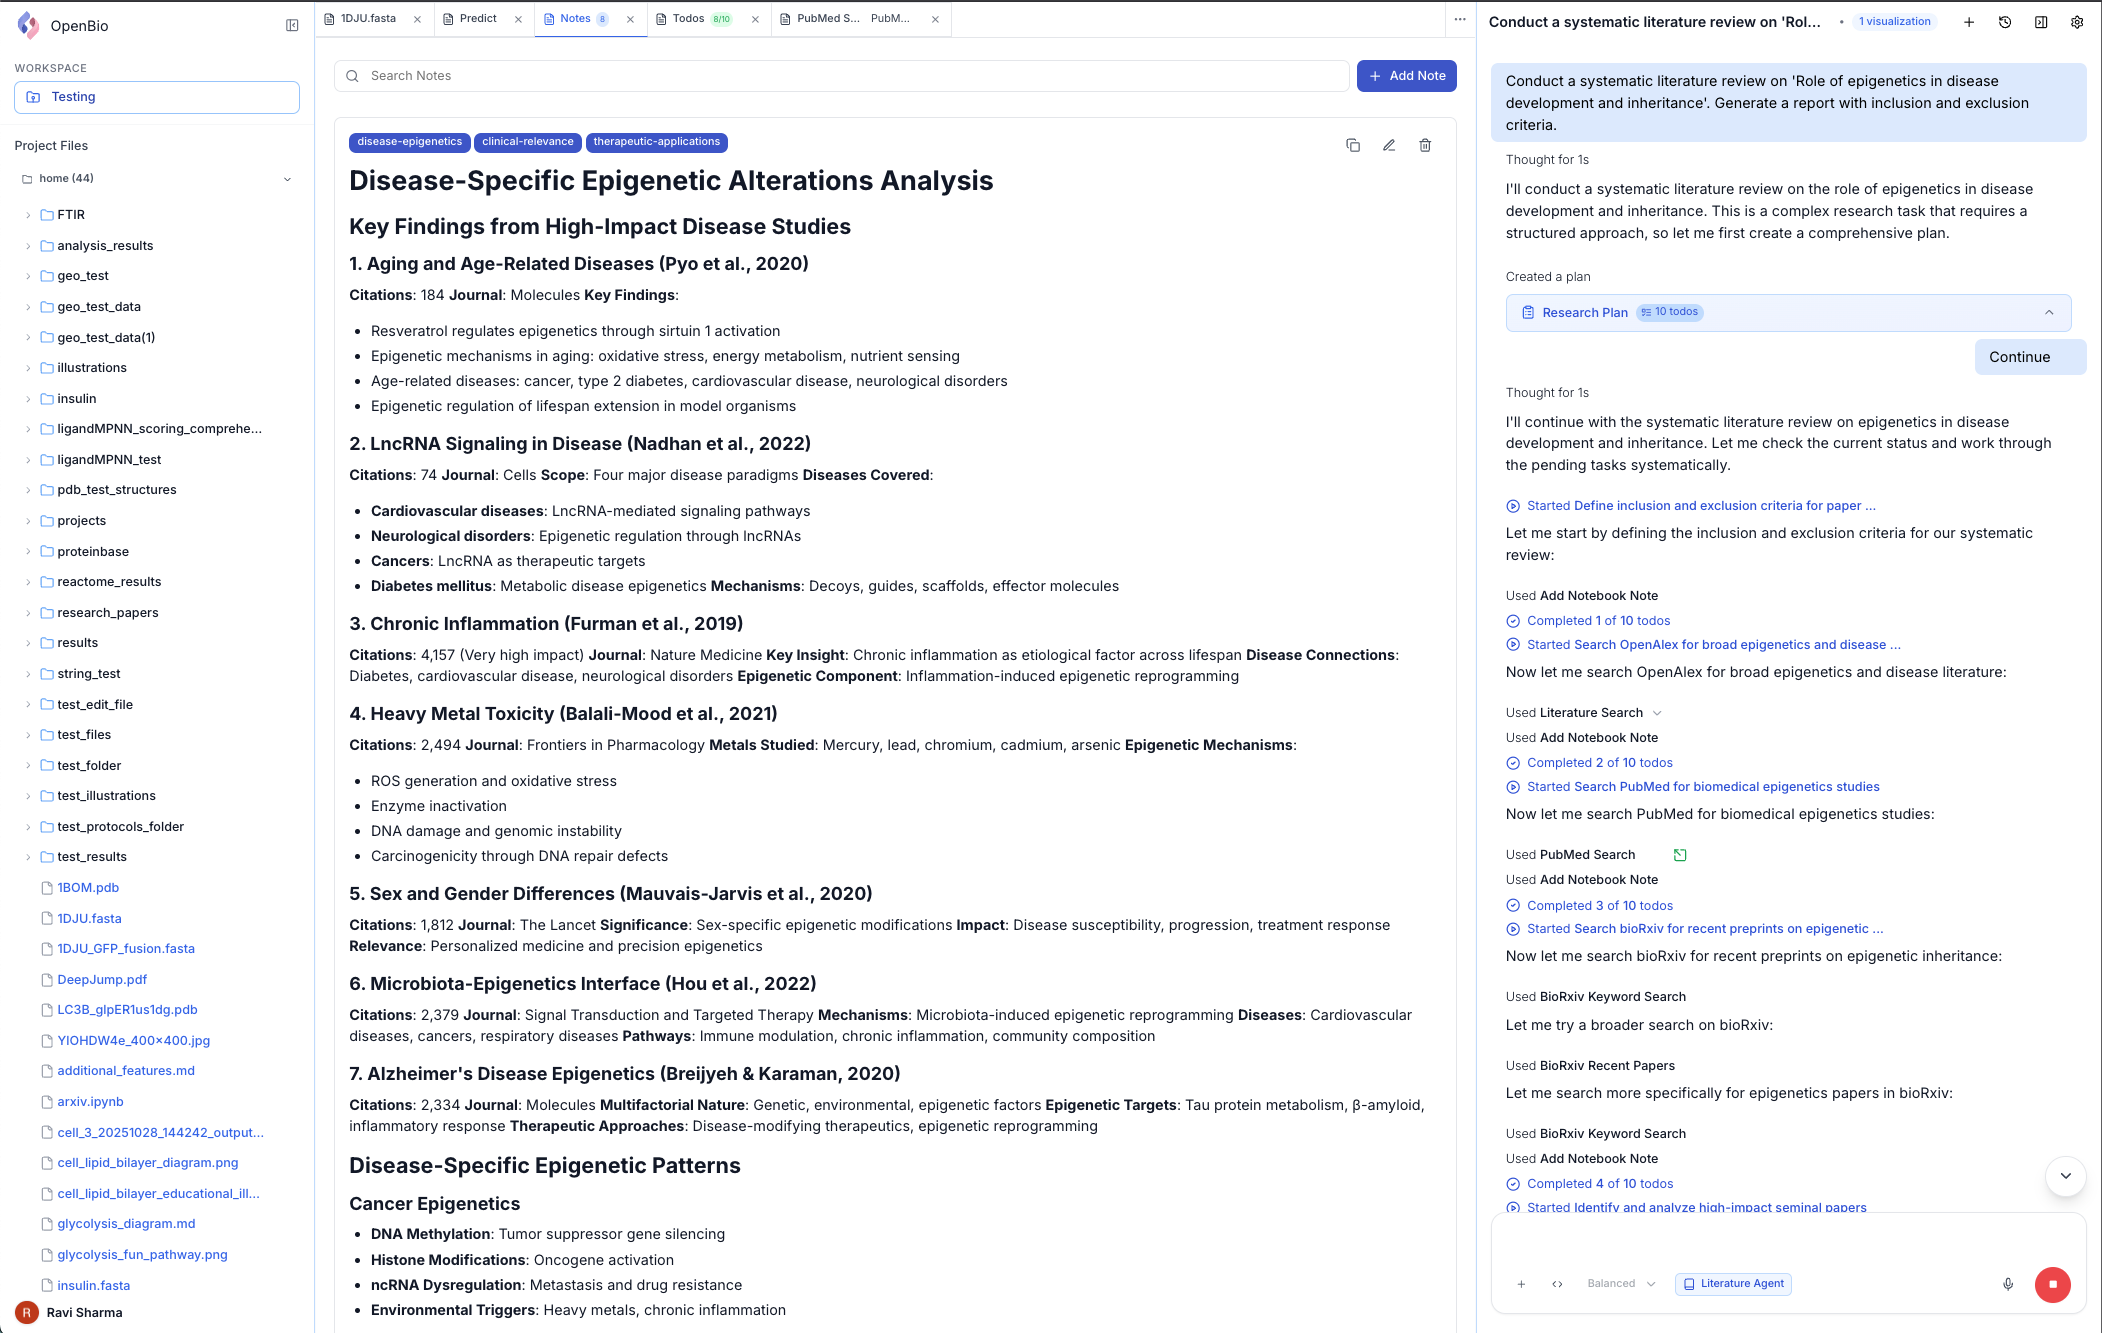 ## Sidebar (Left Panel)
**Location**: Left side of the screen
**Toggle**: Click the collapse icon at the top. Click on the OpenBio logo to toggle it back open
The sidebar is your navigation hub. It contains:
* **Location**: Top of sidebar
* **Sidebar Toggle**: Click to collapse the sidebar
* **Function**: Click to collapse the sidebar
* **Location**: Below the OpenBio logo
* **Function**: Click to switch between projects or create a new one. Click on the project name to switch to it. Click on the "+" button to create a new project.
* **Location**: Below the project selector
* **Function**: Browse and manage files in your current project
* **Features**:
* Folder tree navigation
* Upload button
* Create folder button (+)
* Create file button (folder icon + "+")
* Refresh button
* Click on 3 dots for options (download, delete, rename, add to chat, copy, cut and paste)
* Click on files shown in blue color text, to open special visualizations for that file
* **Location**: Below the files
* **Function**: Browse and manage visualizations in your current project
* **Features**:
* Click on the visualization tab to open it
* Click on vizualization group to open a tabular view of the data
* **Location**: Bottom of sidebar
* **Display**: Your profile picture and name
* **Function**: Click to access:
* Sign out option
## Research Panel (Center Panel)
**Location**: Center of the screen
**Purpose**: Notes, todos, predictions, files and visualizations
The research panel displays your files and visualizations. This is your workspace and open canvas.
You can close or open any tab in the research panel. You can also drag and drop the tabs to reorder them.
The visualizations for tool calls will be shown here.
The notes and todos for the current chat will be shown here. They are usually created automatically by OpenBio. But you can also create them manually.
* Create notes with rich text
* Add tags for organization
* Create and manage todo items
The predictions for the current chat will be shown here.
* View list of available prediction tools
* View running jobs
* Check job status (queued, running, completed, failed)
* View prediction details
Files that you open will be shown here. These can be PDF files, txt files, FASTA files, PDB files, etc.
For each, there is a special visualization that will be shown.
* **Location**: Three dots at the top right of the panel
* **Function**: Click to open the panel controls
* **Features**:
* Click on close panel button to close the panel
* Click on close all tabs button to close all tabs
* Click add tab button to add a new tab (could be files, visualizations, notes, todos, predictions, etc.)
## Chat Panel (Right Panel)
**Location**: Right side of the screen
**Purpose**: Here you interact with OpenBio
The chat panel is where you type your research questions and OpenBio responds to you.
* **Location**: Top of chat area
* **Contains**:
* Chat title (editable by clicking)
* **Location**: Bottom-left of chat input area
* **Available Agents**: General, Protein Design, Literature, Data Analysis, Drug Discovery, Clinical Research, Sequence Analysis, Metabolomics, Genomics, Moloecular Biology, etc.
* **Your messages**: Right-aligned with user icon
* **OpenBio responses**: Left-aligned with OpenBio icon
* **Tool calls**: Expandable cards showing database queries and actions
* Click to expand and see details
* View visualizations button
* **Location**: Bottom-left of chat input area
* **Quick Modes**:
* **Fast** - Quick responses for simple queries and database searches
* **Balanced** - Optimal for most research tasks (recommended)
* **Max** - Highest quality for complex analysis, predictions, and design tasks
* **Model Selection**: Click add model to choose specific models (Claude Sonnet 4, Gemini Flash 2.5, etc.)
* **Adding Models**: Access Settings → Add Model to configure additional AI models
* **Persistence**: Selected model or mode applies to all future messages
**Location**: Bottom of chat area
**Components**:
1. **Model Selector**
* Dropdown menu showing current model
* Click to switch models
* Shows model name and brief description
2. **Text Input**
* Type your messages here
* Supports multi-line input
* Auto-expands as you type
* Supports file references (type `@` to see file suggestions)
* Supports workflow references (type `/workflow:` for workflow suggestions)
3. **Send Button**
* Blue arrow icon
* Click to send message
* Changes to Stop button when generating response
* Keyboard shortcut: **Enter** (Shift+Enter for new line)
4. **Workflow Button**
* Click to add a workflow to the chat
* Shows workflow name and brief description
5. **Files Button**
* Click to add a file to the chat
* Shows file name and brief description
## Top Navigation Bar
**Location**: Top right of the application, above the chat panel
* **Collapse chat panel button (^)**: Click to open and collapse the chat panel
* **New chat button (+)**: Click to create a new chat
* **Chat history button (clock)**: Click to open the chat history
* **Research panel button (code)**: Click to open research panel (only visible when chat panel is collapsed)
* **Dark mode toggle**: Sun/Moon icon on the right
* **Notebooks button**: Click to open the notebooks across all chats
* **Workflows button**: Click to open the workflows panel that has all your saved workflows
* **Predictions button**: Click to open the predictions across all chats
* **Show tutorial**: Click to open the tutorial to guide you through the interface
### Feedback Button
Location: Floating button in bottom-right corner
Quick access to provide feedback:
* Click the floating feedback button (speech bubble icon)
* Share suggestions, report issues, or request features
* Feedback helps improve OpenBio for all researchers
* Button remains accessible across all views
## Customizing Your Interface
Toggle between light and dark modes by clicking the **sun/moon icon** inside the settings button
Dark mode is great for reducing eye strain during long research sessions, working in low-light environments, and better focus on visualizations and data.
Adjust panel widths by dragging the dividers:
1. Hover over the line between panels
2. Your cursor will change to a resize cursor (⇔)
3. Click and drag to adjust width
4. Your preferences are automatically saved
## Mobile Access
OpenBio works seamlessly on mobile browsers without requiring a dedicated app.
### Accessing on Mobile
Visit [openbio.tech](https://openbio.tech) from your mobile browser (Safari, Chrome, or Firefox). Sign in with your existing account to access your projects and conversations.
### Mobile Interface
The mobile view automatically adapts the three-panel layout:
* **Sidebar** - Swipe from left edge or tap the menu icon to access projects and files
* **Research Panel** - View notes, todos, and visualizations in full-screen tabs
* **Chat Panel** - Primary interface for queries and tool execution
Tap the panel switcher at the bottom to toggle between research and chat views.
### Mobile-Optimized Features
* Full chat interface with AI assistance
* Project and file browsing
* Tool execution for database queries and predictions
* Structure visualizations in simplified 2D views
* Touch-friendly controls for navigation
For intensive computational work, use the desktop interface. Mobile is ideal for quick queries, monitoring tasks, and reviewing results on the go.
## Context Menus
Right-click for context-specific options:
### In Chat History
* Rename chat
* Pin/Unpin chat
* Delete chat
### On Files
* Download file
* Delete file
* Rename file
* Add to current chat
* Cut/Copy/Paste file
* Open file in new tab
### On Messages
* Copy message
## Next Steps
Now that you understand the interface, dive deeper into specific features:
Detailed guide to sidebar features
Learn about file management
Learn about predictions
Learn about workflows
**Tip**: Spend time exploring the interface. Hover over buttons to see tooltips, right-click items to discover context menus, and try to understand the different features.
## Sidebar (Left Panel)
**Location**: Left side of the screen
**Toggle**: Click the collapse icon at the top. Click on the OpenBio logo to toggle it back open
The sidebar is your navigation hub. It contains:
* **Location**: Top of sidebar
* **Sidebar Toggle**: Click to collapse the sidebar
* **Function**: Click to collapse the sidebar
* **Location**: Below the OpenBio logo
* **Function**: Click to switch between projects or create a new one. Click on the project name to switch to it. Click on the "+" button to create a new project.
* **Location**: Below the project selector
* **Function**: Browse and manage files in your current project
* **Features**:
* Folder tree navigation
* Upload button
* Create folder button (+)
* Create file button (folder icon + "+")
* Refresh button
* Click on 3 dots for options (download, delete, rename, add to chat, copy, cut and paste)
* Click on files shown in blue color text, to open special visualizations for that file
* **Location**: Below the files
* **Function**: Browse and manage visualizations in your current project
* **Features**:
* Click on the visualization tab to open it
* Click on vizualization group to open a tabular view of the data
* **Location**: Bottom of sidebar
* **Display**: Your profile picture and name
* **Function**: Click to access:
* Sign out option
## Research Panel (Center Panel)
**Location**: Center of the screen
**Purpose**: Notes, todos, predictions, files and visualizations
The research panel displays your files and visualizations. This is your workspace and open canvas.
You can close or open any tab in the research panel. You can also drag and drop the tabs to reorder them.
The visualizations for tool calls will be shown here.
The notes and todos for the current chat will be shown here. They are usually created automatically by OpenBio. But you can also create them manually.
* Create notes with rich text
* Add tags for organization
* Create and manage todo items
The predictions for the current chat will be shown here.
* View list of available prediction tools
* View running jobs
* Check job status (queued, running, completed, failed)
* View prediction details
Files that you open will be shown here. These can be PDF files, txt files, FASTA files, PDB files, etc.
For each, there is a special visualization that will be shown.
* **Location**: Three dots at the top right of the panel
* **Function**: Click to open the panel controls
* **Features**:
* Click on close panel button to close the panel
* Click on close all tabs button to close all tabs
* Click add tab button to add a new tab (could be files, visualizations, notes, todos, predictions, etc.)
## Chat Panel (Right Panel)
**Location**: Right side of the screen
**Purpose**: Here you interact with OpenBio
The chat panel is where you type your research questions and OpenBio responds to you.
* **Location**: Top of chat area
* **Contains**:
* Chat title (editable by clicking)
* **Location**: Bottom-left of chat input area
* **Available Agents**: General, Protein Design, Literature, Data Analysis, Drug Discovery, Clinical Research, Sequence Analysis, Metabolomics, Genomics, Moloecular Biology, etc.
* **Your messages**: Right-aligned with user icon
* **OpenBio responses**: Left-aligned with OpenBio icon
* **Tool calls**: Expandable cards showing database queries and actions
* Click to expand and see details
* View visualizations button
* **Location**: Bottom-left of chat input area
* **Quick Modes**:
* **Fast** - Quick responses for simple queries and database searches
* **Balanced** - Optimal for most research tasks (recommended)
* **Max** - Highest quality for complex analysis, predictions, and design tasks
* **Model Selection**: Click add model to choose specific models (Claude Sonnet 4, Gemini Flash 2.5, etc.)
* **Adding Models**: Access Settings → Add Model to configure additional AI models
* **Persistence**: Selected model or mode applies to all future messages
**Location**: Bottom of chat area
**Components**:
1. **Model Selector**
* Dropdown menu showing current model
* Click to switch models
* Shows model name and brief description
2. **Text Input**
* Type your messages here
* Supports multi-line input
* Auto-expands as you type
* Supports file references (type `@` to see file suggestions)
* Supports workflow references (type `/workflow:` for workflow suggestions)
3. **Send Button**
* Blue arrow icon
* Click to send message
* Changes to Stop button when generating response
* Keyboard shortcut: **Enter** (Shift+Enter for new line)
4. **Workflow Button**
* Click to add a workflow to the chat
* Shows workflow name and brief description
5. **Files Button**
* Click to add a file to the chat
* Shows file name and brief description
## Top Navigation Bar
**Location**: Top right of the application, above the chat panel
* **Collapse chat panel button (^)**: Click to open and collapse the chat panel
* **New chat button (+)**: Click to create a new chat
* **Chat history button (clock)**: Click to open the chat history
* **Research panel button (code)**: Click to open research panel (only visible when chat panel is collapsed)
* **Dark mode toggle**: Sun/Moon icon on the right
* **Notebooks button**: Click to open the notebooks across all chats
* **Workflows button**: Click to open the workflows panel that has all your saved workflows
* **Predictions button**: Click to open the predictions across all chats
* **Show tutorial**: Click to open the tutorial to guide you through the interface
### Feedback Button
Location: Floating button in bottom-right corner
Quick access to provide feedback:
* Click the floating feedback button (speech bubble icon)
* Share suggestions, report issues, or request features
* Feedback helps improve OpenBio for all researchers
* Button remains accessible across all views
## Customizing Your Interface
Toggle between light and dark modes by clicking the **sun/moon icon** inside the settings button
Dark mode is great for reducing eye strain during long research sessions, working in low-light environments, and better focus on visualizations and data.
Adjust panel widths by dragging the dividers:
1. Hover over the line between panels
2. Your cursor will change to a resize cursor (⇔)
3. Click and drag to adjust width
4. Your preferences are automatically saved
## Mobile Access
OpenBio works seamlessly on mobile browsers without requiring a dedicated app.
### Accessing on Mobile
Visit [openbio.tech](https://openbio.tech) from your mobile browser (Safari, Chrome, or Firefox). Sign in with your existing account to access your projects and conversations.
### Mobile Interface
The mobile view automatically adapts the three-panel layout:
* **Sidebar** - Swipe from left edge or tap the menu icon to access projects and files
* **Research Panel** - View notes, todos, and visualizations in full-screen tabs
* **Chat Panel** - Primary interface for queries and tool execution
Tap the panel switcher at the bottom to toggle between research and chat views.
### Mobile-Optimized Features
* Full chat interface with AI assistance
* Project and file browsing
* Tool execution for database queries and predictions
* Structure visualizations in simplified 2D views
* Touch-friendly controls for navigation
For intensive computational work, use the desktop interface. Mobile is ideal for quick queries, monitoring tasks, and reviewing results on the go.
## Context Menus
Right-click for context-specific options:
### In Chat History
* Rename chat
* Pin/Unpin chat
* Delete chat
### On Files
* Download file
* Delete file
* Rename file
* Add to current chat
* Cut/Copy/Paste file
* Open file in new tab
### On Messages
* Copy message
## Next Steps
Now that you understand the interface, dive deeper into specific features:
Detailed guide to sidebar features
Learn about file management
Learn about predictions
Learn about workflows
**Tip**: Spend time exploring the interface. Hover over buttons to see tooltips, right-click items to discover context menus, and try to understand the different features.